Did this site save
(or help earn) you money?
Say thanks with a
small donation.
|
The
TWI Designjet Documents library presented here as a courtesy of
ComputerCareOnline.com
The owners of this website have no affiliation to Hewlett Packard nor do we
claim to represent HP
in any way shape or form.
Return
to TWI Documents Library Index Page
|

In this document:

KRS document number: BPP90194
Last Updated: 11-Sept-2002
Minimum skill level: 1
Introduction
In order to get the most out of the HP Designjet copier cc800ps, it is recommended that the system be connected to a Local Area Network (LAN). Two connections are required: One for the standard HP Jetdirect 615n print server included in the printing subsystem, to print from a user's PC or Mac. The second connection is to retrieve the scanned data from the Scan-to-File operation included in the system. This connection is physically placed in the front panel touch screen. The D:\Images folder has to be shared in the LAN in order to be able to retrieve the scanned data files from a user's PC or Mac.
NOTE: These instructions are for a brand new installation. If the network installation has previously been attempted and problems occurred, use the recovery CD to restore factory defaults before continuing.
Network installation steps
It is recommended that a standard keyboard be connected to the cc800ps Windows 2000 operating system to complete the network install, however; the Windows 2000 operating system does come with an on-screen keyboard if a standard keyboard connection cannot be done.
- Turn the touch-screen system off using the power switch located on the back of the monitor (next to the power cable). If a standard keyboard will be used, continue with step 2, if the on-screen keyboard will be used, continue with step 4.
- Go to the back of the touch-screen monitor and remove the panel covering the Win 2000 OS ports using a small Phillips screwdriver. This provides access to the PS/2 keyboard port, shown in figure 1 below.
- Install the keyboard into the PS/2 port as shown below in figure 2.
- Plug the network cable into the RJ45 connector as shown in figure 3.
- Ensure the network cable (CAT5) is also connected to the networks Ethernet hub.
- Turn the touch-screen monitor (system) on.
- After system initialization the screen shown in figure 4 below will typically be displayed.
- Click on the Setup tab and then click on Exit. The main Windows 2000 Desktop will now appear.
- Using the wand on the Windows 2000 Start menu, choose Start, Setting, Network, Dial-up Connections.
- From the Network and Dial-up Connections, the network interfaces can be viewed.
Figure 6: Network and Dial-up Connections screen
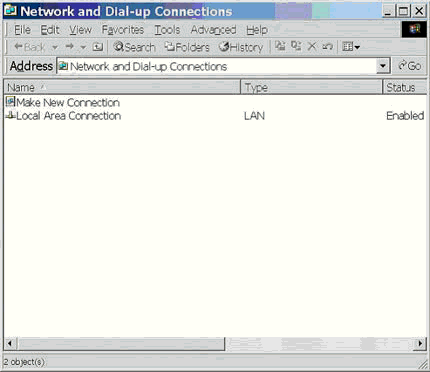
Note the status of the connection:
- If the status is grayed out, it has been disabled from the Device Manager
- If a red X appears over the icon, the adapter is not connected to the live network or the connection has otherwise been broken.
- If the Status is Enabled, the PC sees the active network.
NOTE: The local area connection will have certain incremental numbers assigned to them, depending on how many times a local area connection has been installed in Network and Dial-up Connections, and which connection is installed first.
- If there is more than one local area connection, verify the correct local area connection that is to be used by clicking the icon once and viewing the description in the left side of the window.
- View and configure the adapter configuration by selecting (highlighting) the appropriate Local area connection using the wand.
- Select File, then Properties from the Local area connections main menu.
- The Local Area Connection Properties window will now appear.
- In order to communicate on the network, verify the connection has the following protocols and services listed and checked:
- Client for Microsoft Networks
- File and Printer Sharing for Microsoft Networks
- Internet Protocol (TCP/IP)
If Client for Microsoft Networks is not included, others may be able to see this machine on the network, but this machine will not be able to see other devices and cannot browse the network.
If File and Printer Sharing for Microsoft Networks is not included, no files can be shared across the network.
If Internet Protocol (TCP/IP) is not included, there will be no connectivity to the network.
NOTE: If any of these services are missing, use the recovery CD to change network settings back to default settings and installed services, which include the settings in figure 7. Recovery CD instructions are listed at the end of this document.
- Verify that TCP/IP is configured properly, highlight Internet Protocol TCP/IP and click on Properties.
- By default in Windows 2000, TCP/IP will be configured for DHCP. This is evident by the setting Obtain an IP address automatically, and Obtain DNS server address automatically in the general TCP/IP properties screen (figure 8).
Figure 8: TCP/IP properties
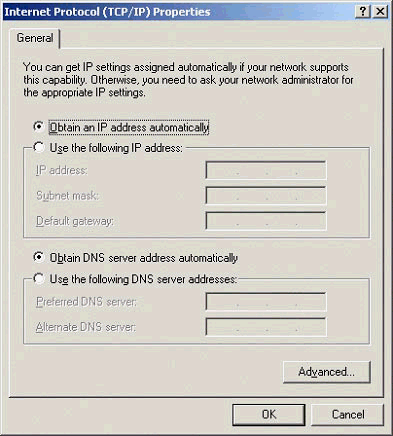
Continue with step 18 below if using DHCP as outlined above, if not using DHCP follow the steps below to create a static IP address:
- Click Use the following IP address, which enables information to be inserted into the IP address, Subnet mask and Default gateway fields.
- Input the IP address, Subnet mask and Default Gateway information into the spaces provided (must use optional keyboard or on-screen touch keyboard to input the numbers and/or characters).
- Click Use the following DNS server addresses and input valid preferred and alternate DNS server IP addresses in the spaces provided (if required).
NOTE: If using the touch-screen keyboard, double click on the number or alpha character twice to appear on the monitor.
NOTE: All of the above addresses must be valid for the network the PC is being attached to. If the values are not known, the IT department or the customer must provide the IP (scheme) values. It is the responsibility of the customer to supply this information.
- When finished making the changes or accepting the current setting, click OK. TCP/IP properties have been saved.
- On the main Window 2000 screen, select Start, and then Run.
- In the Run window type CMD and click OK (will bring up a DOS command prompt as shown in figure 9 below).
- At the prompt, type in ipconfig and press Enter.
- Verify the settings are correct. If the settings are not correct perform steps 17-21 again.
- At the prompt, Ping a client PC on the network using the client PC's IP address (type ping followed by the IP address of another client PC installed on the same local area network).
Figure 10: Pinging from the DOS command prompt
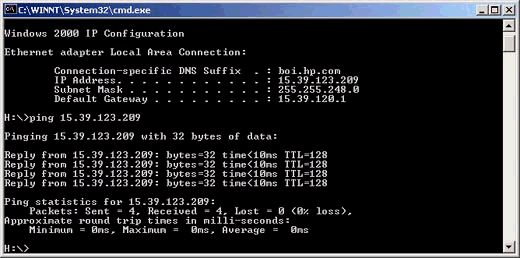
If the above PING is unsuccessful, verify an appropriate IP address was typed in for the Local Area Connection configured (as shown in the IPCONFIG information). If this has been verified and still is unsuccessful, reboot the computer and try again.
- Close the DOS command prompt window.
Verify the Windows 2000 networking is functioning properly
- Using the wand, click on Start, Windows Explorer, and My Network Places.
- Double click Entire Network to browse the network.
- Double click on the network that this client PC is being installed on and verify it is loaded in the appropriate place.
- Close the My Network Places window.
Verify the Windows 2000 client is correctly configured
- Using the wand, click on Start, Settings, and Control Panel.
- In the Control Panel, double click on the System icon.
- Click on the Network Identification tab.
- Verify the Domain or Workgroup name is listed. Also verify the Full computer name is correct.
Figure 11: Network Identification window
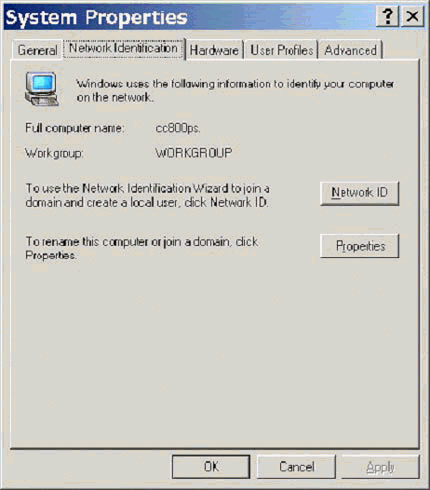
NOTE: Verify with the local IT department that the Full computer name shown has been entered into the device tables of the server, so this client PC will be registered on the network.
- If the information displayed in the Network Identification tab is incorrect, click on Properties to change the values for the computer name or the domain.
- After verifying and/or changing the information, click OK.
- Reboot the PC as prompted.
Verify user properties are not disabled
- Using the wand, click on Start, Settings, and Control Panel.
- Double click on Administrative Tools.
- Double click on Computer Management.
- Click once on the + sign in front of the Local Users and Groups folder.
- Click once on the Users folder.
- Double click on Guest, which brings up the Guest properties screen.
- Remove the checkmark from the Account is disabled option. This enables the cc800ps Windows 2000 PC to be available to the entire network.
- Click Apply.
Sharing the images folder
- Using the wand on the main Windows 2000 screen, click Start, Windows Explorer.
- When Windows Explorer opens, expand My Computer (click once on the + sign), and then expand the D drive.
- Click once on the Images folder (will highlight folder).
- Click on File and then Properties.
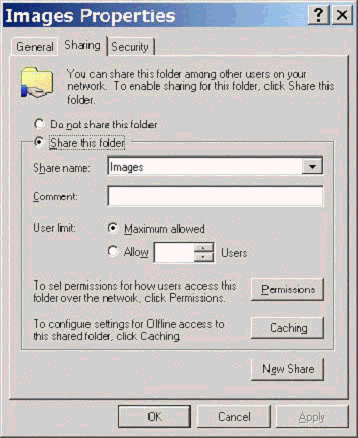
- When the Images Properties screen appears, click on the Sharing tab.
- Select Share this folder, and then click on Apply to complete that sharing of this folder.
Figure 14:
NOTE: It is the IT Administrator/Customer's responsibility to enable any other folders to be shared.
Verify client PC mapping to the cc800ps Win 2000 PC
- Go to a client PC on the network.
- On the main Windows 2000 screen, click Start, Search, For Files or Folders.
- Under the Search for other items section, click on Computers.
- Type in the given computer name for the cc800ps PC.
- Click Search.
- Double click on the computer name found, and the Images folder should appear.
- Click once on the Images folder (will highlight the folder).
- Select File, Map Network Drive.
- The client PC will now be mapped to the cc800ps Windows 2000 PC.
Support Boundaries
The support boundaries listed below cover the aspects of the network installation that HP, or any representatives of HP will, and will NOT perform:
- Will help customer Share the IMAGES Folder Only
- Will help customer change the USER/Guest properties
- Will not add/remove Services
- Will not change/edit passwords
- Will not change/edit/add permissions
If all troubleshooting fails, load the Recovery CD to reload system O/S
NOTE: Before you load the recovery CD, make sure you inform customer that all data files will be removed and any additional software that may be loaded that did not come with cc800ps.
All other support for the Windows 2000 O/S or any additional software loaded is the responsibility of the IT Administrator or Microsoft.
Using the recovery CD
It is recommended that a standard keyboard be connected to the cc800ps Windows 2000 operating system when performing the recovery CD process. Using a keyboard provides a means to select any one of the 4 options available on the recovery CD. If a keyboard cannot be used, the recovery process will only use Option 1, which will re-image the C drive only and leave the data files on the D drive.
- Open the CD-ROM tray located on the left side of the cc800ps touch-screen monitor.
- Place the recovery CD into the drive.
- Close the CD-ROM drive.
- Turn the cc800ps PC off (use the main power switch located at the back of the monitor next to the power cable).
- Allow system to completely shut down (10-15 seconds).
- Turn the PC back on.
- The recovery CD will automatically run.
- The choice of 4 recovery options will appear.
- Scroll the appropriate recovery option and press Enter (if using a keyboard).
- System recovery will now be initiated.
- Allow recovery to finish.
- Perform the network installation process.
MS-DOS (R) is a U.S. registered trademark of
Microsoft Corporation.
Microsoft (R) is a U.S. registered trademark of
Microsoft Corp.
Windows (R) and MS Windows (R) are U. S.
registered trademarks of Microsoft Corp.
Copyright Hewlett-Packard Co. 2002
This information is subject to change without notice and
is provided "as is" with no warranty.
Hewlett-Packard shall not be liable for any direct,
indirect, special, incidental or consequential damages
in connection with the use of this material.


![]()
![]()


